 |
 |
Microsoft Word 2010 |
|
With
 &
&  &
& 
& & Before we start...
1. Please  to download a practice document we will use throughout the class.
2. Click Save as
3. Save the document to your Desktop
2. Click Save as
3. Save the document to your Desktop
![]()
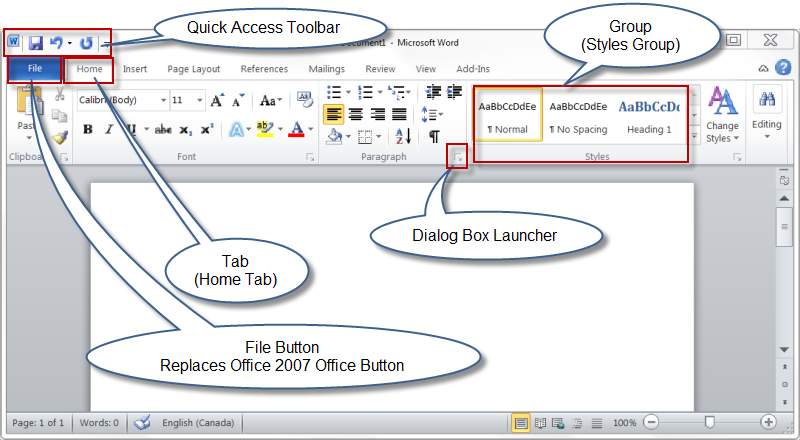
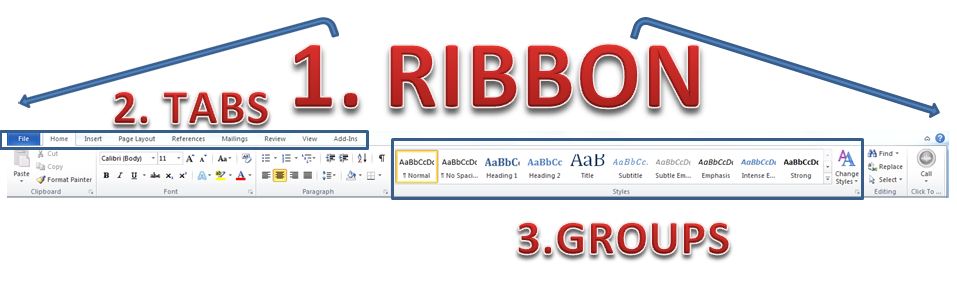
The Menus that you are used to have been replaced by 8 tabs!

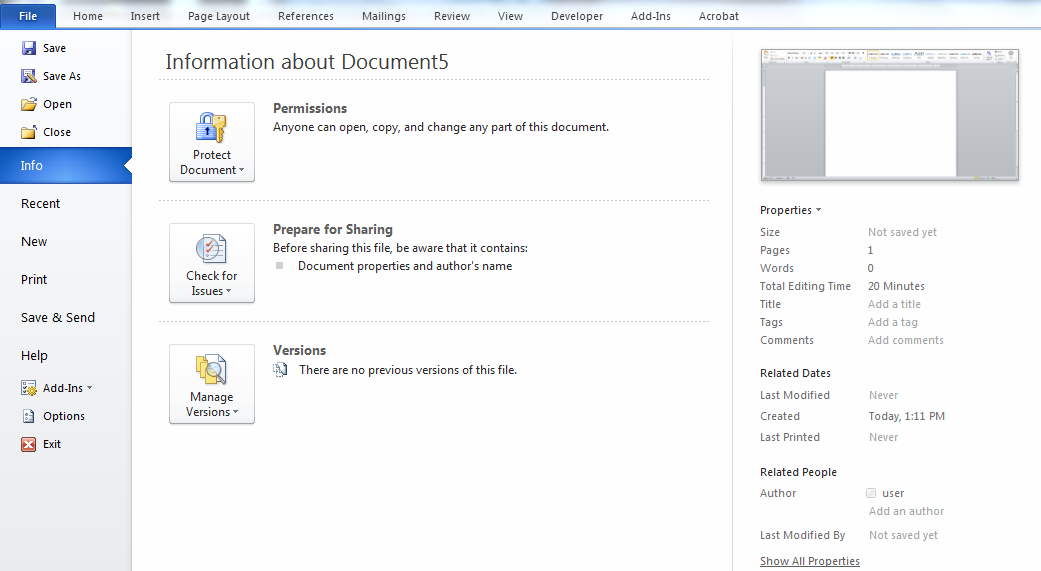 |
- Save As
- Open/Close
- Info
- Permissions- Password Protect/Lock document, Forms...
- Prepare for Sharing- Check for issues if another person will be using the document with a different version
- Versions- manage different versions with different options of the same document
- Recent Documents
- New- In creating new documents, this is the place to choose templates, or to start from a blank document. (there is a preview screen on the right to show the layout!) After you've chosen your layout, CLICK CREATE!!!
- Print- Choose Printer, Choose Print Settings, Number of Copies, CLICK PRINT!
- Save and Send- Allows you to save to the web, change file type, or to send as an attachement in an email.
- Options- Program Options (used to be under the TOOLS Menu)


- Clipboard Group
- Cut
- Copy
- Paste
-
When you paste content, the Paste Options button provides different options, depending on the source program of the content.

Keep Source Formatting This option preserves the look of the original text. 
Keep Text Only This option removes all the original formatting from the text. 
Link & Keep Source Formatting This option preserves the look of the original text, and it maintains a link to the source file and updates the pasted text with any changes that are made to the source file. 
Link & Use Destination Styles This option formats the text to match the style that’s applied where the text is pasted. It also maintains a link to the source file and updates the pasted text with any changes that are made to the source file. 
Merge Formatting This option changes the formatting so that it matches the text that surrounds it. 
Picture This option inserts the text as an image. 
Use Destination Styles This option formats the text to match the style that’s applied where the text is pasted. 
Use Destination Theme This option formats the text to match the theme that’s applied to the document where the text is pasted.
-
- Font Group
- Text Formatting
- Paragraph Group
- Bullets/Numbered list (you can customize multilevel groups!!!)

- Allignment
- Background color (only behind text)
- Borders and Shading
- Sorting
- Indent
- Line Spacing
- Paragraph
- Bullets/Numbered list (you can customize multilevel groups!!!)
- Styles Group
- Quick Styles
- Change Styles
- Shows preview of your document in that style!!!!
- Editing
- Find
- Replace

1. Cut the paragraph that starts with "I look forward to working with your child" and paste it under "Dear Parents,"
2. Make "Dear Parents," Bold
3. Make "Welcome to 3rd Grade" Bold and change the Font to Broadway size 18 and allign it to Center
4. Select "September 14th" at the bottom of the letter and make it Highlighted with the color Green
5. Make "Southeastern North Dakota Elementary School (Northwest Division)" Bold with the font "Ravie"
6. Make "Attentive Listening," "Appreciations," "Right to Pass," and "Mutual Respect," a Numbered List (1. 2. 3. 4.)
7. Make the items (pencils, glue sticks, etc.) a bulleted list.
(tip: After placing the first Bullet, go to the beginning of each line and press Backspace and then Enter.
When you are done with your list, press Enter twice.)


- Pages Group
- Insert a Cover Page (templates are available)
- Insert a Blank Page (not really necessary if you just keep typing, a new page will be created automatically.)