
Movie Maker is addicting !
Below is some general information pertaining to using Movie Maker.

-
Stay organized ~ You must keep folders and files named properly. If you are going to do a project using cat pictures then all your pictures of your cats should be saved in a folder called cats. I can not tell you how important being organized is. You can not be too organized.
-
Don't freak ~ if when you open up Movie Maker and there are pictures or music in the Collection Window. These are leftover from the last project that was done using Movie Maker on that computer. To clear your Collection Window Press Ctrl A (which will select All) items in that window and hit Delete.
-
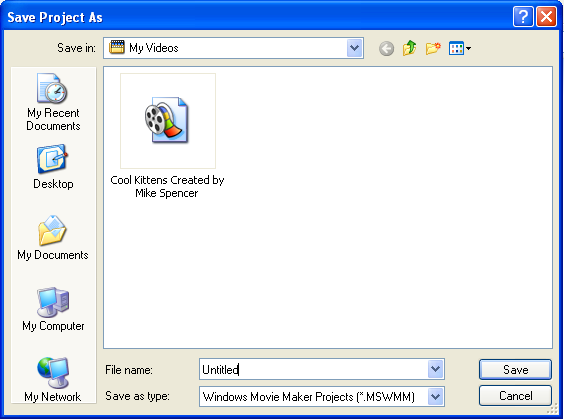
Saving ~ Saving (Ctrl S) is a good idea as soon as you know what your project is going to be about. A few things that are important/interesting when saving. 1) By default, the file will saved in a folder call My Video which in My Documents located on the desktop. 2) Saving does not create a movie, it only saves the project. 3) You always can tell that a file is a Movie Maker project because it looks like the one below, a movie reel.
The file extension for a Movie Maker project is .MSWMM which stands for
MicroSoft Windows Movie Maker.
To learn more about file extensions go to: 
http://www.fileinfo.net/common.php
-
Inserting Pictures ~ When you insert pictures they will be placed into your Collection Window. This does not mean they are in your movie yet. You have to decide on their order. This is done by simply dragging them into the time-line/storyboard area at the bottom of the page. By default the pictures will play for 5 seconds. If you want to change this time, then you can click and drag the picture from the end and stretch it. You will see a double sided red arrow that says "Click and drag to trim the clip". If you hold the mouse cursor over the picture you will be told how long the picture will stay visible in your movie.
-
Making an AutoMovie ~ This is a feature which will take whatever is in the Collection Window and create a movie from those items. When this is done a set of preset features will be applied to the pictures that were in the Collection Window.
 You also have to be aware that sometimes this quick movie creator "Making an AutoMovie" will pick up title overlays that will include weird file names and place them within the project that will appear on top of your pictures. All you will have to do is click on those title overlays and a window will come up which will allow you to change them or you can erase them.
 FREE tutorial series on Movie Maker.
Really worth the look if you like playing with Movie Maker.
http://movies.atomiclearning.com/k12/moviemaker2/
![]()
6495 tracks of music that can be used with MovieMaker PowerPoint projects
